If you have LOW WiFi SIGNAL

Many peoples facing this problem everyday life we can't use the internet at its high speed when signal too low
everything needs the internet. Smart TV, Smart Phone, Laptop, Desktop Computer
But!
One WiFi connection ??????
How can we access the internet at every corner of the house (If large house) it's not sufficient to cover the range!
Every footstep reduce the signal of WiFi
And it's also not good for multi-story Building
So what is the solution to this problem
Solution #
WiFi Repeater !!!!!
Yes, Repeater is the only solution to this problem
A WiFi repeater or extender is used to extend the coverage area of your WiFi network. It works by receiving your existing WiFi signal, amplifying it, and then transmitting the boosted signal. With a WiFi repeater, you can effectively double the coverage area of your WiFi network - reaching far corners of your home or office, different floors, or even extend coverage to your yard.
But its also too bulky and costly !!!! So what to do?
Why not make your own WiFi Repeater
We use NODE MCU (IoT) for our this project
What is Node MCU ??
Introduction: The NodeMcu is an open-source firmware and development kit that helps you to prototype your IOT product within a few Lua script lines.nodemcu-esp8266
Recommended study
How to build your own WiFi extender from a cheap ESP8266 WiFi module Notes: It will have slower connection speeds the farther the extender is away from your router, but fast speeds are not necessary for many IoT projects. I needed a cheap way to increase WiFi range so that an IoT snail mail alert device could reach a distant WiFi router to connect to the internet and send the notification to my phone. I stumbled upon Martin Ger's WiFi NAT Router firmware for the ESP8266 WiFi module, flashed it onto my $2 ESP-01 WiFi module, and it works quite well. The router my extender connects to only reaches about 20 feet due to a wall, but with the extender plugged in 10 feet to 50 feet away from it, the connection reaches 310 feetStep 1: Download the Files

Download the .zip from given link here
which contains the firmware files and software tools you will need.
Unzip the ZIP File and Browse for "ESPFlashDownloadTool_v3.4.1.exe"
Double Click and open it
Unzip the ZIP File and Browse for "ESPFlashDownloadTool_v3.4.1.exe"
Double Click and open it
Step 2: Get the Required Parts

1. Small Plastic Case (For Enclosure)
2. Node MCU (IoT) available online store @ 250-350 INR
3. WiFi Antenna (In my case I have to get it from my old router )
4. Small Wire for connection between node MCU and antenna
5. USB cable (For power up the node MCU)
6. Charger 5.0 v (Can be used any mobile charger ) or You can use power Bank
NOTE: Charger Amp should be less than 1A Greater than 1A can overheat the node MCU and can burn it.
Step 3: Download the Driver
In order to get the USB adapter talking to the computer, you may need to install the CH340 driver.
The subfolder from the zip you downloaded and extracted is called "CH341SER_win" for Windows or "CH34x_Install_mac" for Macs. Simply open the program in the folder and install the drivers
The subfolder from the zip you downloaded and extracted is called "CH341SER_win" for Windows or "CH34x_Install_mac" for Macs. Simply open the program in the folder and install the drivers


Plug the ESP01 into the USB adapter, plug it all into your computer, and flip the physical switch to "Prog" programming mode not "UART" mode.
open up the program in the subfolder called "flash_download_tools_v3.4.1_win". Open the next subfolder called "_MACOSX" if you are using a Mac, or open the subfolder called "FLASH_DOWNLOAD_TOOLS_V3.4.1_WIN"
if you are on a Windows PC. Run the application called "ESPFlashDownloadTool_v3.4.1" and select "ESP8266" after that.
Setup that program to the setting shown in the screenshot below if you are using the ESP01 from the earlier shopping
step: 1. If you are using a NodeMCU or Wemos D1 Mini module instead of the ESP01 or ESP07, switch the part that says "8Mbit" to "32Mbit" instead
2. For the ESP01 or ESP07, under "Download Path Config", click the three dots button for each section and browse to find the "firmware_sdk_1.5.4". Click each one and type out their names to the right as shown in the screenshot e.g. "0x00000" and "0x40000"
2.2. If you are using a different ESP8266 module variant instead of the esp01 I suggested, use the folder named "firmware" and use those .bins instead with their corresponding names to the right.
3. Select the COM port you want, and set the baud rate to "115200", then click "start", "flash" or "connect".
4. When it says "finish", unplug your adapter and ESP8266 module from your computer.
5. Flip the physical switch on the USB Adapter back to non-programming non-flash mode. This is important!
Step 5: Configure Your Extender
You must connect a computer to your extender in order to configure it. You can do this by using a serial terminal app such as the Arduino IDE serial monitor setting the baud rate to "115200" with NL&CR
Once you have connected over serial
(Without quotes, and replacing the hashtag symbols with your desired settings.)
set SSID ####
This sets to the name of the router hotspot you want the extender to extend.
set password #####
This sets the password of the router hotspot you want the extender to extend.
set ap_ssid #####
This sets the name of the extender's hotspot.
set ap_password ####
This sets the password of the extender's hotspot.
NOTE: the password must be more than 8 characters long!
set ap_open 0
This turns password protection ON so only people who know the password can connect to the extender.
save
This saves your settings.
quit
This terminates a remote session.
Unplug the extender. That's it for the setup!
Tips: You ought to wait a couple seconds between typing in each command, and you might need to type save after each command! If you need to wipe all your settings back to default, you can type reset factory followed by saving For a master list of all possible commands, you can type help. To see your configuration, you can type the show.
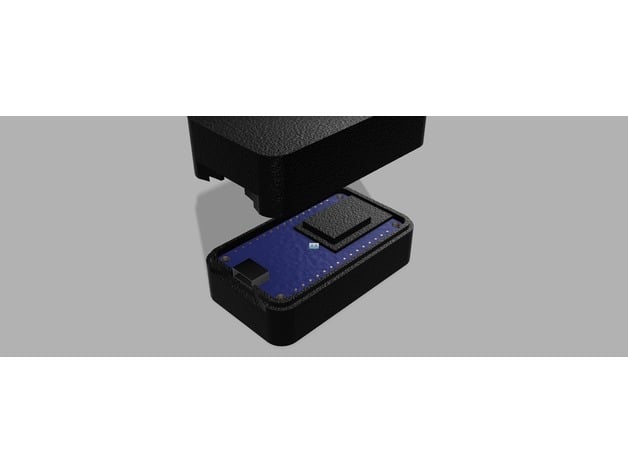
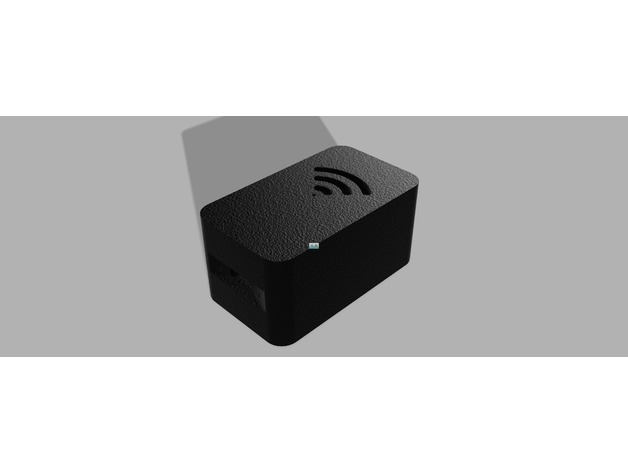
You can use a plastic container to house your extender.
I plugged the extender (both the node MCU and the wifi antenna ) stuffed it all into half of a small case, then hot glued a seal to rainproof it.
I plugged the extender (both the node MCU and the wifi antenna ) stuffed it all into half of a small case, then hot glued a seal to rainproof it.
This is a Nice post . I'm definitely going to look into it.Really very useful tips for Netgear router login are provided here. Keep on the efforts for offering such imperative info.
ReplyDeleteNetgear Extender Setup
Its a great pleasure reading your post.Its full of information I am looking for and I love to post a comment that "The content of your post is awesome" Great work.
ReplyDeleteBT wi-fi booster
Nice blog! Shop online for Shelly products at Smartguy, a leading online shopping store for Shelly products at low prices.
ReplyDeleteBuy shelly wifi relay online
Really awsome repeater but many condition to use best wifi extender for better range.
ReplyDeleteAre you facing issues while getting a reliable and strong WiFi signal throughout your home or office? If yes, then a Wireless-N WiFi extender is the best solution for you. With the help of a Wireless-N WiFi repeater setup, you can double the range of your existing WiFi network. All you need to perform is the Wireless repeater setup and then you can enjoy the seam-less internet in every corner of your house or office.
ReplyDeleteYour knowledge is best ,About built wi-fi extender.https://bestwifiextender.co.uk/
ReplyDeletejs24fitness
ReplyDelete