 DIY Arduino Based Fire Fighting Robot Project
According to National Crime Records Bureau (NCRB), it is estimated that more than 1.2 lakh deaths have been caused because of fire accidents in India from 2010-2014. Even though there are a lot of precautions taken for Fire accidents, these natural/man-made disasters do occur now and then. In the event of a fire breakout, to rescue people and to put out the fire we are forced to use human resources which are not safe. With the advancement of technology especially in Robotics it is very much possible to replace humans with robots for fighting the fire. This would improve the efficiency of firefighters and would also prevent them from risking human lives. Today we are going to build aFire Fighting Robot using Arduino, which will automatically sense the fire and start the water pump
In this project, we will learn how to build a simple robot using Arduino that could move towards the fire and pump out water around it to put down the fire. It is a very simple robot that would teach us the underlying concept of robotics; you would be able to build more sophisticated robots once you understand the following basics. So let’s get started...
Material Required:
- Arduino UNO
- Fire sensor or Flame sensor (3 Nos)
- Servo Motor (SG90)
- L293D motor Driver module
- Small Breadboard
- Robot chassis with motors and wheel (any type)
- A small can
- Connecting wires
Working Concept of Fire Fighting Robot:
The main brain of this project is the Arduino, but in-order to sense fire we use the Fire sensor module(flame sensor) that is shown below.

As you can see these sensors have an IR Receiver (Photodiode) which is used to detect the fire. How is this possible? When fire burns it emits a small amount of Infra-red light, this light will be received by the IR receiver on the sensor module. Then we use an Op-Amp to check for change in voltage across the IR Receiver, so that if a fire is detected the output pin (DO) will give 0V(LOW) and if the is no fire the output pin will be 5V(HIGH).
So, we place three such sensors in three directions of the robot to sense on which direction the fire is burning.

We detect the direction of the fire we can use the motors to move near the fire by driving our motors through the L293D module. When near a fire we have to put it out using water. Using a small container we can carry water, a 5V pump is also placed in the container and the whole container is placed on top of a servo motor so that we can control the direction in which the water has to be sprayed. Let’s proceed with the connections now
Circuit Diagram:
The complete circuit diagram for this Fire Fighting Robot is given below
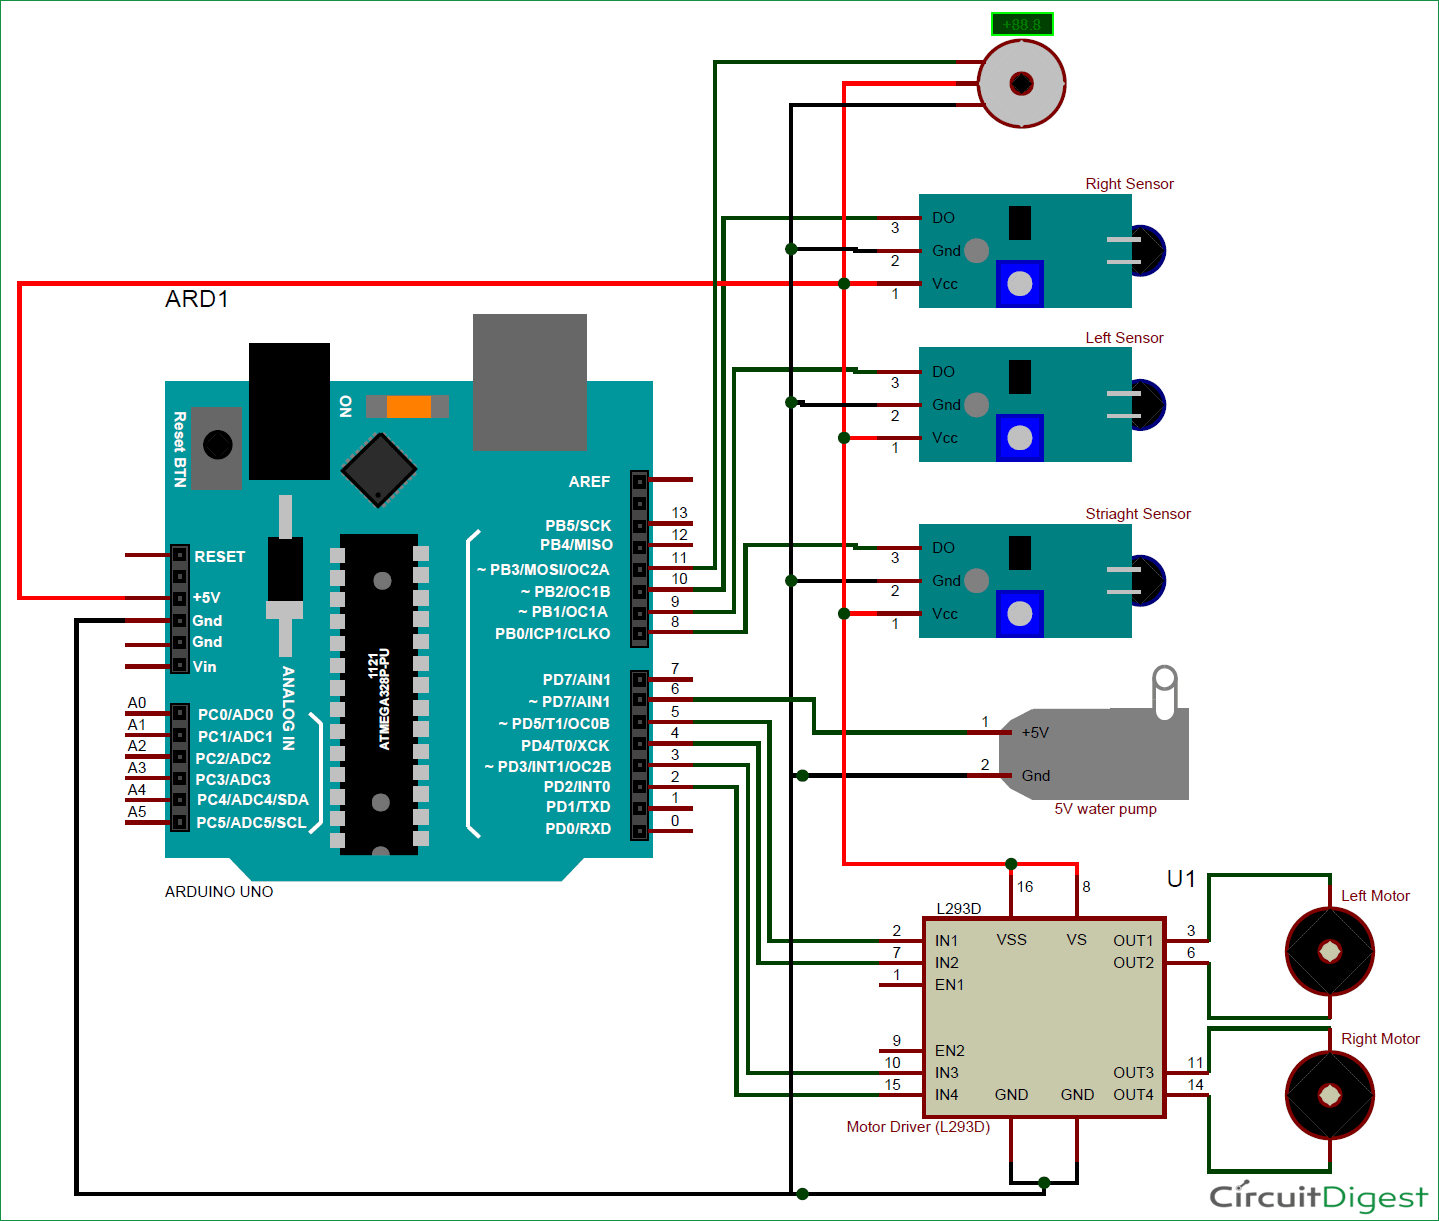
You can either connect all the shown connections for uploading the program to check the working or you can assemble the bot completely and then proceed with the connections. Both ways the connections are very simple and you should be able to get it right.
Based on the robotic chassis that you are using you might not be able to use the same type of container that I am using. In that case use your own creativity to set up the pumping system. However the code will remain same. I used a small aluminium can (cool drinks can) to set the pump inside it and poured water inside it. I then assembled the whole can on top of a servo motor to control the direction of water. My robot looks something like this after assembly.


As you can see, I have fixed the servo fin to the bottom of the container using got glue and have fixed the servo motor with chassis using nuts and bolts. We can simply place the container on top of the motor and trigger the pump inside it to pump water outside through the tube. The whole container can then be rotated using the servo to control the direction of the water.
Programming your Arduino:
Once you are ready with your hardware, you can upload the Arduino code for some action. Thecomplete program is given at the end of this page. However I have further explained few important bits and pieces here.
As we know the fire sensor will output a HIGH when there is fire and will output a LOW when there is fire. So we have to keep checking these sensor if any fire has occurred. If no fire is there we ask the motors to remain stop by making all the pins high as shown below
    if (digitalRead(Left_S) ==1 && digitalRead(Right_S)==1 && digitalRead(Forward_S) ==1) //If Fire not detected all sensors are zero
    {
    //Do not move the robot
    digitalWrite(LM1, HIGH);
    digitalWrite(LM2, HIGH);
    digitalWrite(RM1, HIGH);
    digitalWrite(RM2, HIGH);
    }
Similarly, if there is any fire we can ask the robot to move in that direction by rotating the respective motor. Once it reaches the fire the left and right sensor will not detect the fire as it would be standing straight ahead of the fire. Now we use the variable named “fire” that would execute the function to put off the fire.
    else if (digitalRead(Forward_S) ==0) //If Fire is straight ahead
    {
    //Move the robot forward
    digitalWrite(LM1, HIGH);
    digitalWrite(LM2, LOW);
    digitalWrite(RM1, HIGH);
    digitalWrite(RM2, LOW);
    fire = true;
    }
Once the variable fire becomes true, the fire fighting robot arduino code will execute the put_off_firefunction until the fire is put off. This is done using the code below.
     while (fire == true)
     {
      put_off_fire();
     }
Inside the put_off_fire() we just have to stop the robot by making all the pins high. Then turn on the pump to push water outside the container, while this is done we can also use the servo motor to rotate the container so that the water is split all over uniformly. This is done using the code below
void put_off_fire()
{
     delay (500);
    digitalWrite(LM1, HIGH);
    digitalWrite(LM2, HIGH);
    digitalWrite(RM1, HIGH);
    digitalWrite(RM2, HIGH);
   digitalWrite(pump, HIGH); delay(500);
    for (pos = 50; pos <= 130; pos += 1) {
    myservo.write(pos);
    delay(10);
  }
 for (pos = 130; pos >= 50; pos -= 1) {
    myservo.write(pos);
    delay(10);
  }
  digitalWrite(pump,LOW);
  myservo.write(90);
    fire=false;
}
Working of Fire Fighting Robot:
It is recommended to check the output of the robot in steps rather than running it all together for the first time. You can build the robot upto the servo motor and check if it is able to follow the fire successfully. Then you can check if the pump and the servo motor are working properly. Once everything is working as expected you can run the program below and enjoy the complete working of the fire fighter robot.

The complete working of the robot can be found at the video given below. The maximum distance to which the fire can be detected depends on the size of the fire, for a small matchstick the distance is relatively less. You can also use the potentiometers on top of the modules to control the sensitivity of the robot. I have used a power bank to power the robot you can use a battery or even power it with a 12V battery.
Hope you understood the project and would enjoy building something similar. If you have any problems in getting this build, use the comment section below to post your quires or use the forums for technical help.
Code:
#include <Servo.h>
Servo myservo;
int pos = 0;
boolean fire = false;
/*-------defining Inputs------*/
#define Left_S 9 // left sensor
#define Right_S 10 // right sensor
#define Forward_S 8 //forward sensor
/*-------defining Outputs------*/
#define LM1 2 // left motor
#define LM2 3 // left motor
#define RM1 4 // right motor
#define RM2 5 // right motor
#define pump 6
void setup()
{
pinMode(Left_S, INPUT);
pinMode(Right_S, INPUT);
pinMode(Forward_S, INPUT);
pinMode(LM1, OUTPUT);
pinMode(LM2, OUTPUT);
pinMode(RM1, OUTPUT);
pinMode(RM2, OUTPUT);
pinMode(pump, OUTPUT);
myservo.attach(11);
myservo.write(90);
}
void put_off_fire()
{
delay (500);
digitalWrite(LM1, HIGH);
digitalWrite(LM2, HIGH);
digitalWrite(RM1, HIGH);
digitalWrite(RM2, HIGH);
digitalWrite(pump, HIGH); delay(500);
for (pos = 50; pos <= 130; pos += 1) {
myservo.write(pos);
delay(10);
}
for (pos = 130; pos >= 50; pos -= 1) {
myservo.write(pos);
delay(10);
}
digitalWrite(pump,LOW);
myservo.write(90);
fire=false;
}
void loop()
{
myservo.write(90); //Sweep_Servo();
if (digitalRead(Left_S) ==1 && digitalRead(Right_S)==1 && digitalRead(Forward_S) ==1) //If Fire not detected all sensors are zero
{
//Do not move the robot
digitalWrite(LM1, HIGH);
digitalWrite(LM2, HIGH);
digitalWrite(RM1, HIGH);
digitalWrite(RM2, HIGH);
}
else if (digitalRead(Forward_S) ==0) //If Fire is straight ahead
{
//Move the robot forward
digitalWrite(LM1, HIGH);
digitalWrite(LM2, LOW);
digitalWrite(RM1, HIGH);
digitalWrite(RM2, LOW);
fire = true;
}
else if (digitalRead(Left_S) ==0) //If Fire is to the left
{
//Move the robot left
digitalWrite(LM1, HIGH);
digitalWrite(LM2, LOW);
digitalWrite(RM1, HIGH);
digitalWrite(RM2, HIGH);
}
else if (digitalRead(Right_S) ==0) //If Fire is to the right
{
//Move the robot right
digitalWrite(LM1, HIGH);
digitalWrite(LM2, HIGH);
digitalWrite(RM1, HIGH);
digitalWrite(RM2, LOW);
}
delay(300); //Slow down the speed of robot
while (fire == true)
{
put_off_fire();
}
}
Comments
Post a Comment