
Cthulhinho is a custom-built, Arduino based MIDI controller by Matija Kostevc. It was designed to
control multiple instruments at once during live performances. Using the
buttons on the top panel, you can control 5 separate synthesizers by triggering
chords and song sections. Each button can trigger MIDI parts, and one can
switch into arpeggiator mode.
Using the analog-looking rotary encoder, you
can cycle through parameters, which are viewed on the 128×64 OLED. To create a
sequence, you set up to 6 separate chords by selecting them within the
instrument or playing in the notes with MIDI learn. These chords are mapped to
the top buttons, using the shift modifier button to select chords 5 & 6.
Combining the shift button and the rotary encoder results in changing the chord
inversions.
Not only can Cthulhinho play chords, but
it has a built-in arpeggiator too. The arp allows 16 steps for each of the 6
available tracks. letting you set the volume, gate, octave, and CC data. All of
these MIDI patterns can be added to the sequencer, which allows you to combine
chords and arpeggios into a full song.
Using the global settings, you can dig deeper
into the playback. Options such as letting you set bassline mode, which outputs
a single note of the chord, and adjusting the BPM and pitch are available.
On the connection side, it features DIN MIDI
inputs and output ports, along with a 1/8″ jack for syncing with external
gear, such as a drum machine.
PARTS LIST
- Arduino Nano
- 124x64 OLED I2C Display
- 1 rotary encoder
- 5 big buttons
- 1 small button
- 2 LEDS
- 2 midi DIN female jacks
- 1 two pole two way switch
- 6 x 220 ohm resistor
- 1 optocoupler (6N138 or alternative)
- 1 diode (1N914 or alternative)
- strip board (4 island, gnd and + line) and some wire
- some spare plywood, some screws, hot glue
SCHEMATICS
IMPORTANT UPDATE: Code is updated to support external tick sync. D2 from the rotary pushbutton was moved to D9 and D2 (since it's an interrupt pin) is used with external sync (tip, ring/sleeve to GND).
If you plan to set chord notes via a menu, you don't need the messy midi-in part (half shorter parts list) and the picture looks even more simple. THE sequencer LED is also optional.
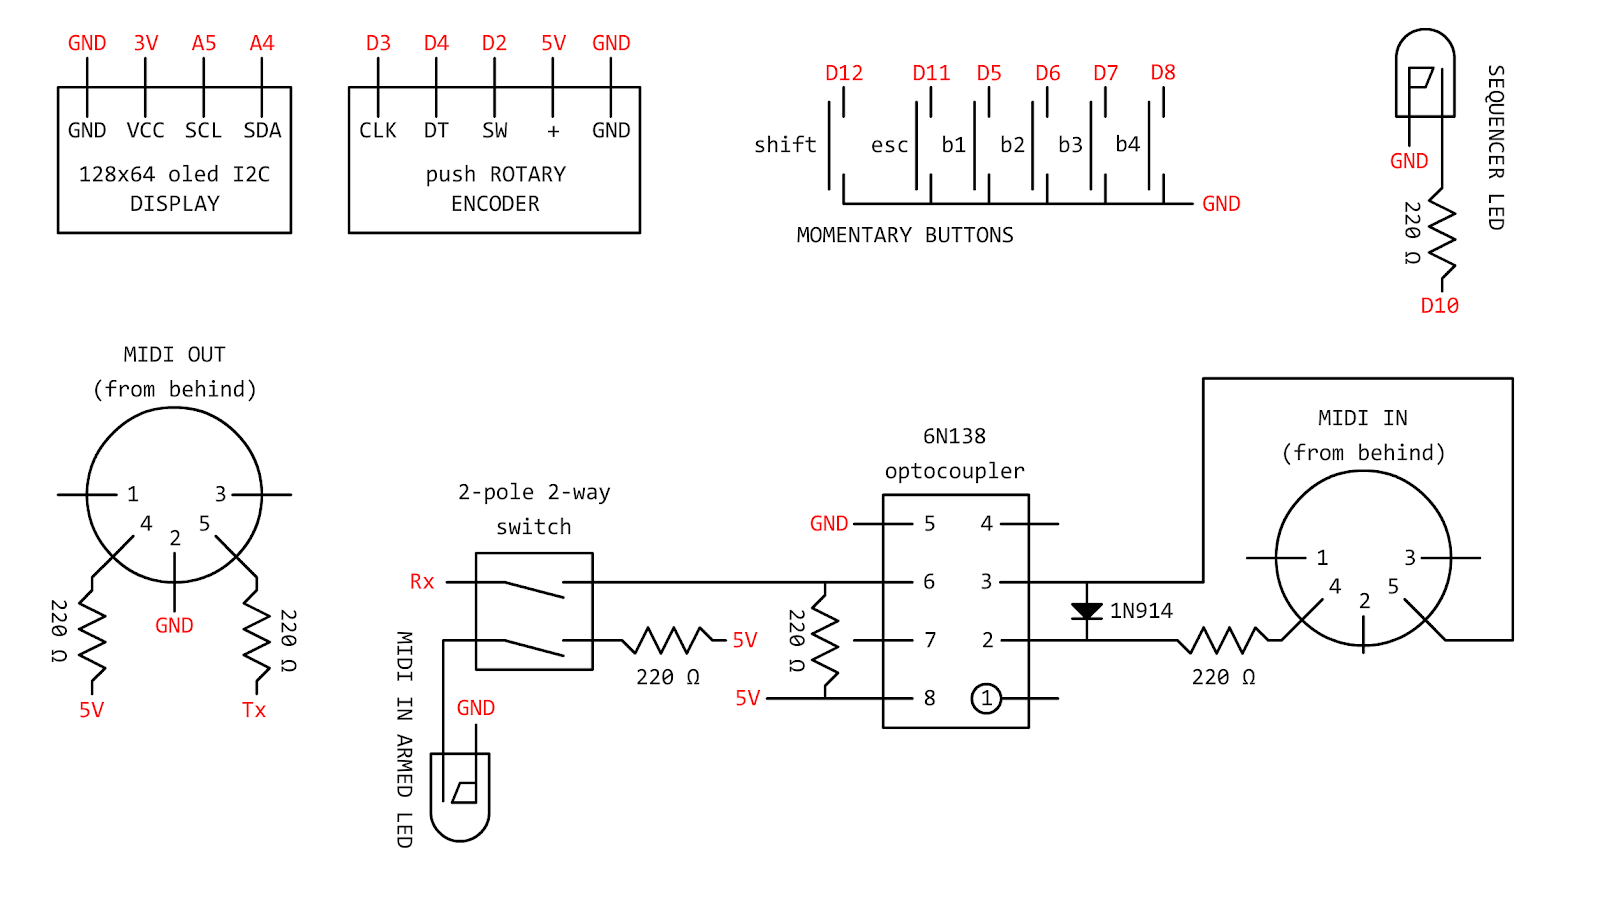
(Arduino pins are colored
red)
All in all, this is a pretty great machine. the minimal amount of controls is deceiving the complexity of the features available. The full source, schematics, and manuals are available on the project’s website.
Comments
Post a Comment